Water Permeability of Roof Tiles
We are often asked questions – and sometimes receive complaints – about the water permeability of roof tiles. In this article we answer the most common questions and help avoid the installation mistakes that lead to damp problems in tiled roofs.
1. Introduction
Our company places top priority on the quality of its products. It is a management commitment and standing policy to supply bricks and roof tiles of excellent quality, made from the best materials and tested in our fully equipped laboratories.
The specifications of roof tiles for the European market are set out in standard EN 1304, which refers to a series of standards for carrying out the tests. We apply factory production control based on ELOT EN 1304 and carry out all the tests it describes in our own laboratory, with fully trained scientific staff. The impermeability test is described in standard EN 539-1, which specifies two methods (Method 1, Method 2).
After testing, tiles are classified into two categories, 1 and 2. The manufacturer must declare which method was used, and results are assessed on that basis.
| Method 1 impermeability factor IF (cm³/cm² per day) | Method 2 impermeability coefficient IC | |
|---|---|---|
| Category 1the best | mean ≤ 0.5 individual ≤ 0.6 | mean ≤ 0.8 individual ≤ 0.85 |
| Category 2 | mean ≤ 0.8 individual ≤ 0.9 | mean ≤ 0.925 individual ≤ 0.95 |
2. Impermeability – Standard EN 539-1
The standard specifies two test methods for determining the impermeability of clay roofing tiles, which are considered equivalent. Tiles are tested as sampled; if they were already installed on a building, the stresses they have suffered are taken into account when interpreting the results.
Test method 1
It determines the quantity of water passing through the body of the tile within 48 hours, per cm² of surface, under a constant 10 cm water column. Sample size: 10 tiles.
- PreparationThe tiles are immersed in tap water for 48 hours, dried with hot air until the water has fully evaporated and left for at least 4 hours at room temperature.
- SpecimensSquare specimens of 45 ± 2 mm × 25 ± 2 mm or round ones of Ø 50 ± 2 mm are cut from the thinnest section. A glass tube of Ø 38 ± 1 mm and 150 ± 2 mm height is fitted on the weather-exposed surface, and the cut surfaces are sealed.
- 48-hour immersionTube and specimen are placed in water, 1 cm above the exposed surface, on two thin non-porous supports.
- 10 cm water columnThe tube is filled to 10 cm above the water level of the container and kept constant by a graduated continuous-supply vessel. After 48 hours the volume of water that passed through is recorded, V1.
- Evaporation correctionAn identical tube with a non-absorbent glass plate is placed alongside. Its weight difference after 48 hours is the evaporated volume, V2 (1 g/cm³).
- CalculationThe impermeability factor IF, in cm³/cm² per day, is calculated with the appropriate formula.
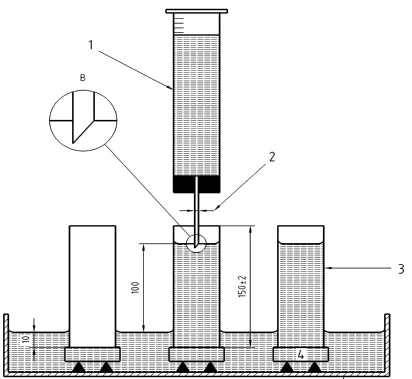
1. Graduated test tube · 2. Continuous-supply tube · 3. Evaporation reference tube · 4. Glass plate
What it means in practice
Using the coefficients of §4.4.1 of EN 1304 over the 48 hours of the test, tiles are suitable if they absorb less than 1.8 cm³/cm² per specimen and 1.6 cm³/cm² on average. They are classified in Category 1 if these values are up to 1.2 and 1 cm³/cm² respectively (after deducting evaporation). The standard makes no mention of absorption rates.
Test method 2 – the one we apply
The Panagiotopoulos S.A. laboratory uses method 2:
Testing the water impermeability of a clay roofing tile or fitting by determining the time elapsed before drops start to fall, after water is applied to the surface of the tile normally exposed to the weather.EN 539-1, Principle of method 2
- PreparationSample of 10 tiles. Immersion in tap water for 48 hours, drying with hot air and at least 4 hours at room temperature.
- FrameA frame is fitted on the exposed surface of the tile (excluding parts covered on the roof) and sealed with waterproof material. The tile is supported horizontally, within ±5°.
- WaterTap water is added continuously inside the frame, to a level of 60 ± 5 mm at the lowest point and 10 ± 5 mm at the highest.
- MeasurementA device under the specimen, connected to a timer, measures the time until the first drop falls to within ±15 min. Maximum duration 20 hours, at 20 ± 2 °C and 60 ± 5 % humidity, without draughts.
- ResultThe impermeability coefficient IC is calculated and the tiles are classified according to EN 1304.
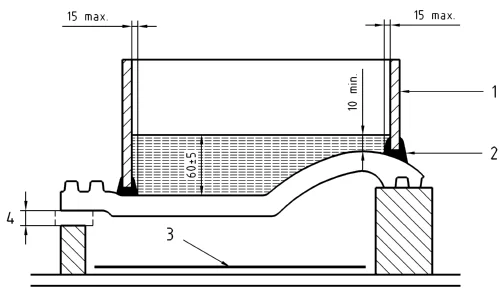
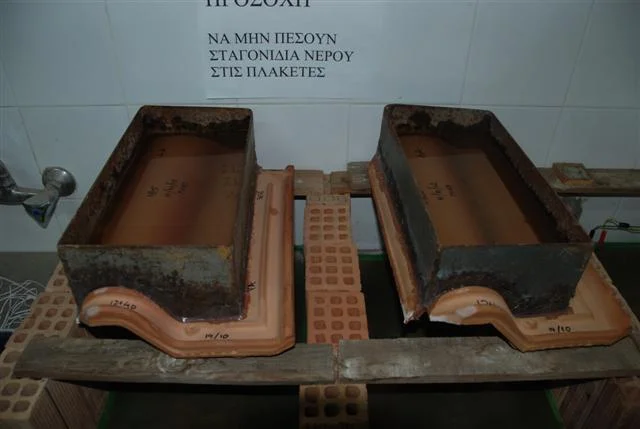
1. Frame · 2. Waterproof sealant · 3. Drop detection device · 4. Height adjustment for horizontal position
In practice, the method 2 categories mean:
All Panagiotopoulos S.A. roof tiles drip only after 4 hours and are classified in the best category of the standard. Most batches complete the maximum test duration (20 hours) without a single drop falling (IC = 0).
The test in our laboratory
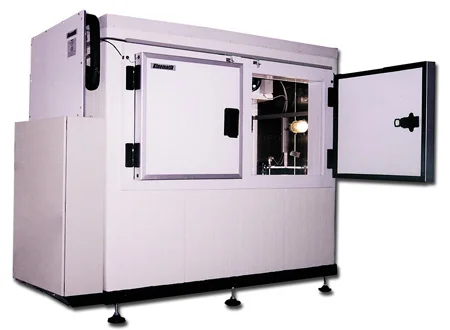
After preparation, a metal frame sealed with silicone is fitted to the tiles. Once dry, each specimen is placed on the measuring rig and filled with water to the levels of EN 539-1.
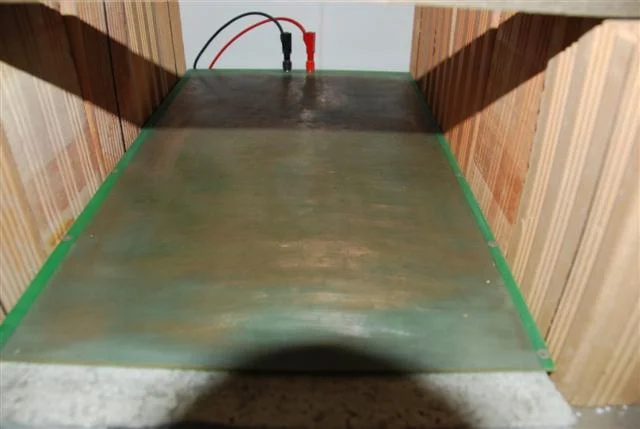
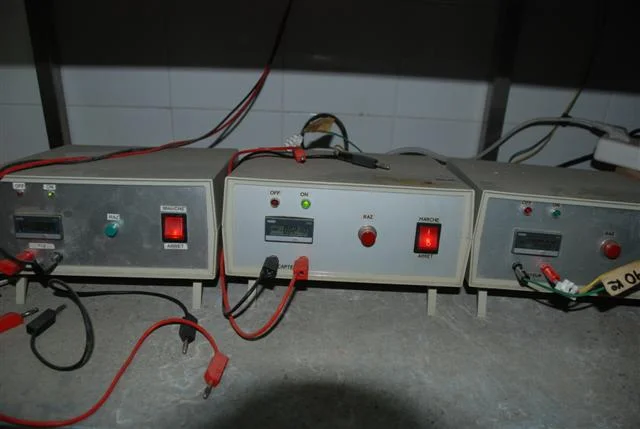
Under the supports there is an electronic board connected to a digital timer. When a drop falls, the water closes the circuit on the board and the timer stops.
Maintenance and checks
- Thorough cleaning of moisture and salts from the boards
- Every month: test of the boards with a dropper at a random point
- Every three months: timers compared against a second timer
- Tests with every new production batch or process change
3. Tile impermeability vs. roof watertightness
Regarding watertightness, the following distinction should be made:
a) Material impermeability
EN 539-1 defines it as the impermeability of a single piece, as described above: both methods are carried out on specimens, not on assembled roofs.
b) Roof watertightness
As a construction assembly it is not defined by any standard. It is governed by good building practice: design, execution and external factors.
Parameters that affect the watertightness of a tiled roof:
- Fit and interlocking* of the tiles
- Roof pitch
- Free drainage of water
- Correct installation of the waterproof underlay and drainage
- ClimateHeavy rainfall with strong wind.
- SurroundingsNearby trees and vegetation that can block the drainage paths of rainwater.
These parameters act in combination. The roofer, guided by the supervising engineer, should consider them all together, from the site survey and design through to handover.
*Interlocking, per EN 1304: the design system for joining two adjacent tiles or fittings, usually comprising raised parts (“ribs”) and recessed parts (“grooves”).
Interlocking on the Roman roof tile
A Roman-type tile has folds and geometric features that allow tiles to interlock with each other and be laid on the roof:
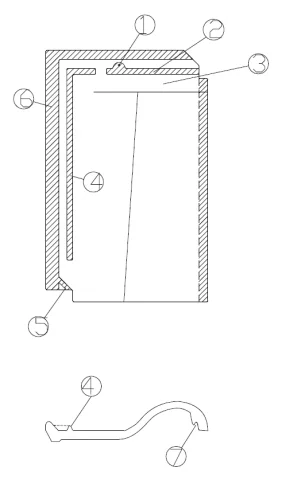
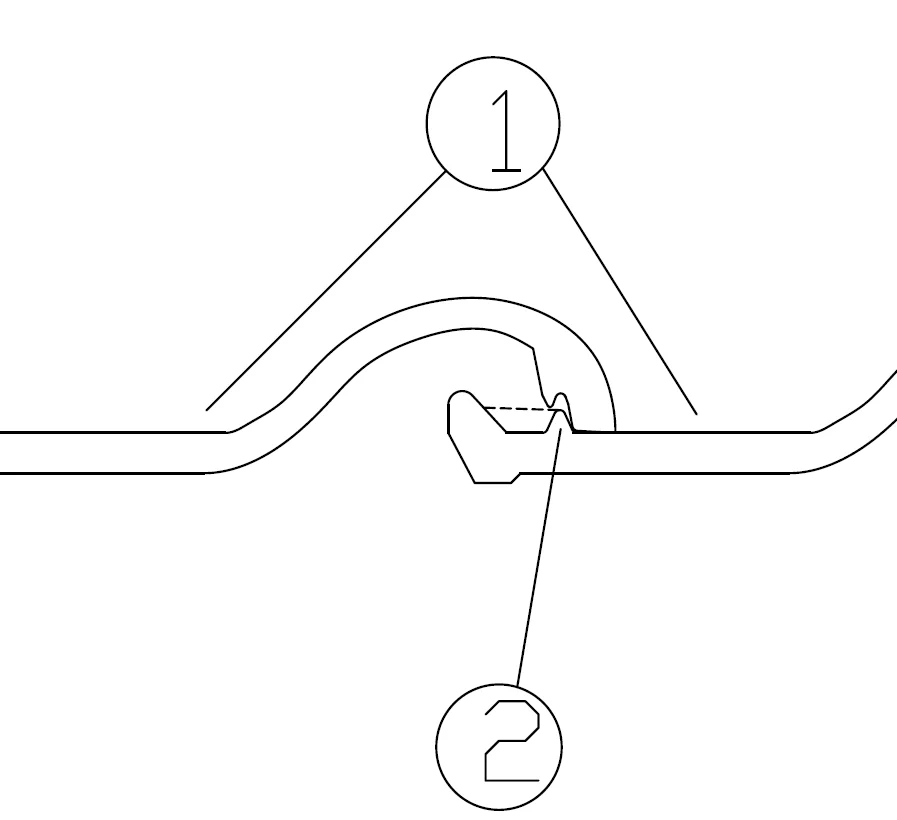
Rib-and-groove interlocking lets rainwater run off the flow surfaces. If moisture passes the rib, it is stopped by the longitudinal water-stop rib (6) until it reaches the drainage rib (5) and is led back to the flow surface. Similar interlocking exists on the transverse axis, so that the tiles are laid overlapping.
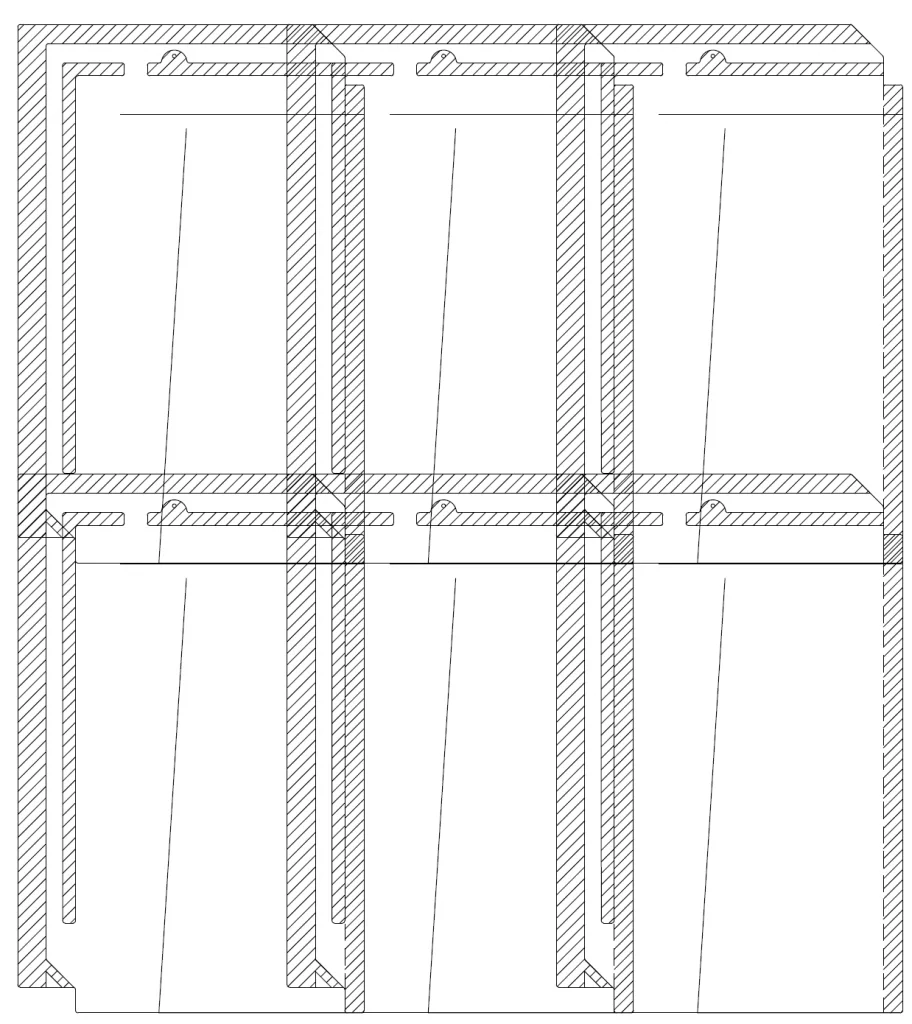
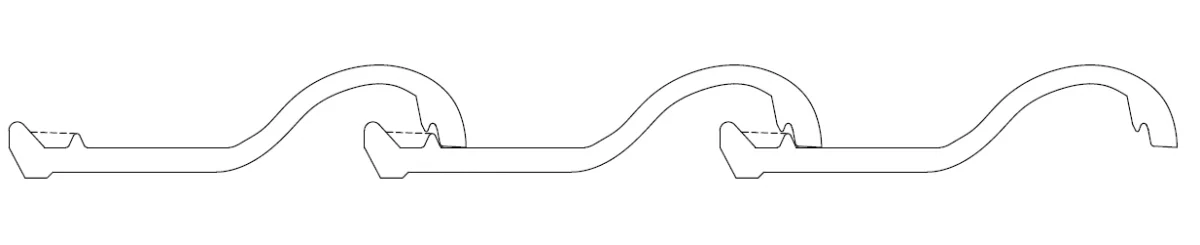
How Roman roof tiles are laid:
Why a waterproof membrane is needed
With this interlocking and Category 1 tiles, a watertight roof is possible but not guaranteed, because with:
- a low pitch
- heavy rainfall
- wind
- adverse surroundings
- unfavourable design parameters, or a combination of these
the flow surfaces may not be able to carry away all the rain. They become saturated quickly and, by the principle of communicating vessels, water can pass the interlocks and reach the layers beneath the tiles.
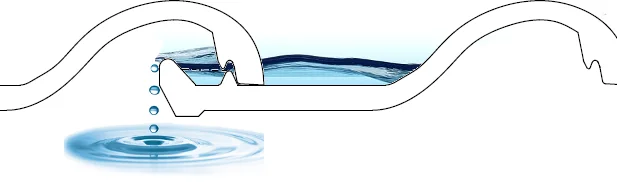
Roof tiles are designed to shed rainwater through their overlaps and the pitch. But they have many gaps, so in strong wind water ingress is very likely: the joints loosen under wind pressure while rain is pushed into the gaps.
That is why a waterproof membrane is essential
- It must be breathable, letting water vapour escape while stopping water ingress.
- It must end in the gutter. Otherwise drainage pipes lead the water to a channel, gutter or free outfall, off the roof.
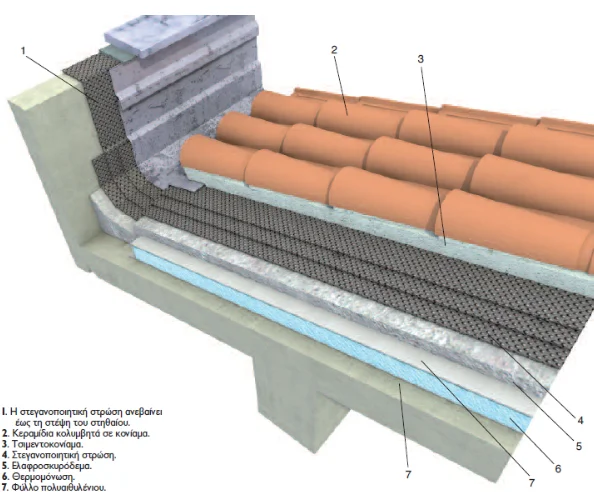
- On a parapet roof it rises to the top of the parapet and turns over it, protecting the parapets.
Pitch and drainage
Correct drainage design is essential: suitable pitches prevent water from pooling and the tile channels from filling quickly in heavy rain.
On a parapet roof, without correct detailing, water soaks the parapets and the collecting gutter, runs back under the tiles and wets the sloping slab or structure. The gutter is built between the roof edge and the parapet, with downpipes at the lowest points.
4. Common installation mistakes
Membrane ending at the fascia
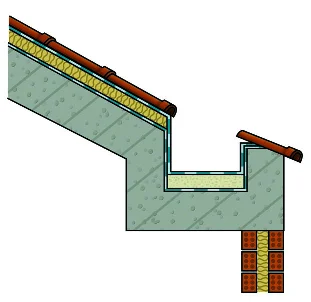
Wrong: the waterproof layers stop and are sealed at the fascia instead of ending in a rain gutter. Water passing under the tiles collects at the lowest points and gradually destroys the fascia.
Right: the membrane is raised and turned over the fascia, under the eaves tiles. If the gutter must not be visible for aesthetic reasons, a perimeter concrete channel can be formed with a fascia and tiles as an extension of the roof.
Nailing the membrane to the boarding
Wrong: the membrane is nailed directly to the roof boarding. Water flows at the lowest level, meets the nails and passes through beneath the waterproof layer.
Right: the membrane is nailed on the counter-battens above the boarding, so the nails sit on the high points and not in the water’s path.
Conclusion
“Panagiotopoulos” roof tiles belong to the best impermeability category of EN 1304 – and most batches complete the 20-hour test without a single drop.
The watertightness of a roof, however, depends on its construction: correct pitch, a breathable membrane that leads water off the roof, and careful installation. For any question, our technical team is at your disposal.
- EN 1304:2005, Hellenic Organization for Standardization (ELOT), Athens, April 2005
- EN 539-1:2005, Hellenic Organization for Standardization, Athens, September 2005
- Περιοδικό ΚΤΙΡΙΟ, Ειδική Έκδοση Εφαρμογές – Τεχνικές Οδηγίες Κατασκευαστών, Υλικά και Προδιαγραφές, 2004-2005, Άρθρο «Ξύλινες Στέγες» (σελ. 48-52)
- Περιοδικό ΚΤΙΡΙΟ, Ειδική Έκδοση Εφαρμογές – Τεχνικές Οδηγίες Κατασκευαστών, Υλικά και Προδιαγραφές, 2008-2009, Ενότητα Όψεις – Στέγες – Επικαλύψεις, παρ. 1-9, σελ. 47-54
- Περιοδικό ΚΤΙΡΙΟ, Ειδική Έκδοση Ξύλινη Στέγη – Κατασκευή, Υλικά, Θερμομόνωση, Στεγανοποίηση, Επικαλύψεις, Φωτοβολταϊκά, Εξαρτήματα, Επισκευή, Θεσσαλονίκη, 2007
- Κρανιώτης Δημ., Διπλ. Πολ. Μηχανικός, «Στεγανοποίηση στα κτίρια από τη φάση του σχεδιασμού», Περιοδικό ΚΤΙΡΙΟ – Τεχνικές Σελίδες, Σεπτέμβριος 2010
- Οργανισμός Σχολικών Κτιρίων Α.Ε., Τεχνική Περιγραφή Οικοδομικών Εργασιών, Αθήνα 2008